Salted Caramel recipe

Salted Caramel Sauce

Home-made Salted Caramel Sauce recipe

If you have never tried making your own Salted Caramel, I would really encourage you to give it a go as it is easy to make and is so much more delicious – sweet, creamy, buttery – than any shop-bought, pre-made versions. It is clearly not the healthiest recipe but I firmly believe that everyone needs a treat every now and then and a little goes a long way.

Loved this recipe? Checkout the Recipe Index.

Recent posts on tastebotanical

Is it hard to make Salted Caramel sauce?

No, it is very straight-forward. There are lots of Salted Caramel recipes but this one is a really quick and easy. In some recipes, you are told to melt the sugar on its own at the start. This is fine if you know what you are doing but it is easy to burn it and end up with a bitter-tasting sauce. In this recipe, the sugar is added to the melted butter which prevents it burning and results in a deliciously sweet and creamy caramel sauce. You do not need any additional equipment, such as a sugar thermometer, to make it.

Salted Caramel Sauce
Do I have to add salt to my caramel?

No. It is up to you whether or not you add salt to the caramel. If you don’t like it, leave it out. The amount of salt that you add is up to you. I add a small amount – around half a teaspoon – as I think it brings out the flavour of the caramel.

How long does it last?

The smart answer is, in my house, freshly-made caramel sauce lasts about fifteen minutes. Particularly, if my children are at home. However, if you can resist the temptation to eat it straight from the pan, you can pour the sauce into a sterilised jam jar. Put the lid on the jar and store it in the fridge for up to two weeks.

There are various methods of sterilising jars. I generally sterilise my jars by washing them in warm, soapy water, rinsing well and then drying off for 15 minutes in an oven set at 140 C/280 F/gas 1.

Salted Caramel Sauce
How can I use Salted Caramel sauce?

As well as using it as a cake drizzle, Salted Caramel is great as a sauce with ice-cream or spread over the top of a cheesecake.

  • It can be used, either warm or cold, as a sauce for ice cream. I think it goes particularly well with coffee, chocolate, vanilla and nut flavours. You can also serve it with plain yogurt, particularly thicker Greek-style yogurt.
  • In addition to being a great sauce for ice cream, you can also use it as an ingredient in home-made ice cream. I stir it into my Apple Ice Cream so you get a ripple of salted caramel running through it.
  • It can be used as a sauce for traditional sponge puddings instead of – or in addition to – cream or custard.
  • Spread or drizzle it on a cheesecake or over a pavlova. I use it to make my Apple Pavlova. I also sometimes use it instead of ready-made dulce de leche to make Banoffee Pie.
  • The cooled sauce is brilliant as a cake drizzle. I use it on my Latte Cake but you can use it on lots of different cakes. It is good with coffee, chocolate or vanilla flavoured cakes. I also like it on nut-flavoured cakes – particularly hazelnut and walnut.
  • You can also stir a spoonful of caramel into your coffee, hot chocolate or mug of hot milk.

Loved this recipe? Checkout the Recipe Index.

Other sauce recipes

If you like this recipe, you might like to have a look at some of my other sauce recipes.

Easy Salted Caramel Sauce recipe

Print
clock clock iconcutlery cutlery iconflag flag iconfolder folder iconinstagram instagram iconpinterest pinterest iconfacebook facebook iconprint print iconsquares squares iconheart heart iconheart solid heart solid icon
Salted Caramel Sauce

Salted Caramel recipe

5 Stars 4 Stars 3 Stars 2 Stars 1 Star 5 from 2 reviews
  • Author: Tastebotanical
  • Total Time: 5 minutes
  • Yield: 1 large jar 1x

Description

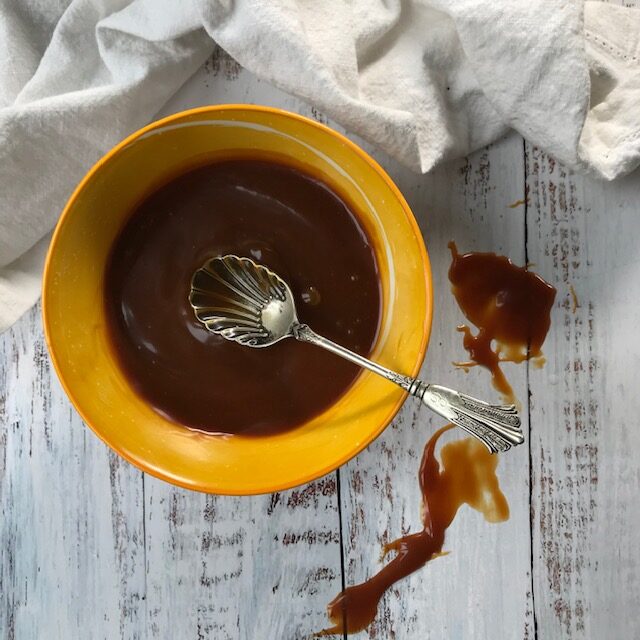
This quick and easy home-made Salted Caramel Sauce is deliciously sweet, creamy and buttery.   


Ingredients

Scale
  • 125 g (4 oz) butter
  • 250 g (8 oz) light brown muscovado sugar
  • 125 g (4 oz) double cream
  • Salt to taste

Instructions

  1. Melt the butter in a small pan.

  2. Add the muscovado sugar. 

  3. Heat gently until the sugar is dissolved.   

  4. Add the double cream and continue to heat for another two or three minutes. 

  5. Remove from the heat and add salt to taste.   

  6. Serve warm or allow to cool.  The caramel will thicken as it cools. 


This recipe has been shared on #CookBlogShare with A Strong Coffee and #Fiesta Friday with Fiesta Friday  and  Jhuls @ The Not So Creative Cook

Loved this recipe? Checkout the Recipe Index.

Blackberry Ice Cream

Blackberry Ice Cream flavoured with Bay

This Blackberry Ice Cream is perfect for late summer or early autumn when the blackberries are in season. It is a simple, custard-based ice cream which is flavoured with a sweetened puree of blackberries. I also add an additional flavouring by adding bay leaves to the custard mixture. Blackberry and bay is an excellent flavour pairing. The warm spiciness of the bay provides a background note to the sweet and sour flavour of the berries.

Loved this recipe? Checkout the Recipe Index.

Recent posts on tastebotanical

What you need to know about this Blackberry and Bay Ice Cream

Loved this recipe? Checkout the Recipe Index.

  • As I am keen on using seasonal, local produce, I make this ice cream with foraged wild blackberries. However, if you want to make it outside of blackberry season – August to September in the UK – then it is absolutely fine to use shop-bought blackberries. However, the blackberries that you buy in the shops are bred for sweetness and will not have the sharp, sweet-sour flavour of wild blackberries. If you are using shop-bought blackberries, you may want to add the juice of one additional lemon to the ice cream mixture.
  • I like to experiment with flavour combinations and so I have added bay leaf to the recipe. If you don’t have any bay leaves to hand, or simply don’t like the idea of adding this to your ice cream, that is fine. Just leave it out. The ice cream will still taste good!
  • Although you can make this recipe without an ice cream maker, it is a lot easier if you have one. You can buy a basic ice cream maker fairly cheaply.
  • It is best to start this recipe the day before you eat it. This will mean that once you have made the basic custard, it will have time to chill down before you put it in the ice cream maker the next day.
  • You can also make this ice cream well in advance if that is more convenient. I generally make double the quantity and keep it in the freezer where it will last for up to three months.
  • As with most home-made ice creams, it helps to remove the container from the freezer about ten minutes before serving as this will make it easier to scoop.

How to eat this Blackberry and Bay Ice Cream

This ice cream is pretty good just serves on its own. However, here are a some ideas for other ways that you can serve it.

  • A few fresh blackberries served with the ice cream is a good addition.
  • Blackberry and apple is a classic combination. You could serve this ice cream as an accompaniment to any apple-based dessert. It is excellent served along with Apple Ice Cream and also with Apple Crumble or Apple Pie.
  • A drizzle of something alcoholic is also a good way to go with any ice cream in my view. Try something with a base note of apple, such as an apple liqueur. Alternatively, go for a double hit of blackberry by using Blackberry Gin.
In praise of blackberries

I try to use seasonal, local food but I am not an expert forager and am still on a steep learning curve about identifying and using wild food. However, blackberries are a foraged food that I have picked and enjoyed since I was a child. They are easily identifiable and grow in abundance pretty much everywhere in late summer. The time to pick blackberries is August and September. I will pick enough to use immediately and also try and pick a supply for the freezer as they freeze very well. In addition to ice cream, they are great in crumbles and pies and can also be used to make Blackberry Gin and Blackberry Muffins.

Other home-made ice cream recipes

I am a great home-made ice cream enthusiast. I make it in the summer, of course, but am happy to eat it in winter too! There are some brilliant, shop-bought ice creams available but it is so easy to make your own. I like to experiment with flavours and some of my other recipes are listed below.

  • Roasted Cherry Ice Cream – juicy fresh cherries with a bit of booze make this a rich and indulgent dessert (you can leave out the alcohol if you really want to)
  • Coffee Ice Cream – quick and easy, store-cupboard recipe using instant coffee which has an amazingly rich coffee flavour
  • Cranberry Ice Cream – if you have any left-over cranberry sauce, you know what to do with it
  • Elderflower Ice-cream – easy recipe using elderflower cordial – delicious floral taste of summer!
  • Lavender Ice-cream – another gorgeous floral ice cream (bit of a theme here at tastebotanical…) made with fresh or dried culinary lavender
  • Lemon Curd Ice Cream – this tangy, three-ingredient recipe is probably the simplest ice cream recipe you will find
  • Rose Ice-cream – made with culinary rosewater, this ice cream is the essence of an English summer garden
  • Strawberry Balsamic Ice-cream – strawberry ice cream given a lift with a dash of balsamic vinegar to bring out the sweetness
  • Thyme ice-cream with honey and mascarpone – thyme, honey and mascarpone…. in an ice cream – what’s not to like?

This recipe has been shared on #CookBlogShare with Lost in Food and #Fiesta Friday with Fiesta Friday  and  Zeba @ Food For The Soul

Blackberry Ice Cream recipe

Print
clock clock iconcutlery cutlery iconflag flag iconfolder folder iconinstagram instagram iconpinterest pinterest iconfacebook facebook iconprint print iconsquares squares iconheart heart iconheart solid heart solid icon
Blackberry Ice Cream

Blackberry Ice Cream

5 Stars 4 Stars 3 Stars 2 Stars 1 Star 5 from 4 reviews
  • Author: Tastebotanical
  • Prep Time: 20
  • Total Time: 20 minutes
  • Yield: Serves 6
  • Category: Ice Cream
  • Cuisine: English

Description

This Blackberry Ice Cream is made from juicy fresh blackberries enhanced by the rich spicy flavour of Bay.


Ingredients

Scale
  • 450 g (1 lb) fresh blackberries
  • 50 g (5 oz) caster sugar
  • Juice of 1 lemon
  • 425 ml (15 fl oz) double cream
  • 4 bay leaves (fresh or dried)
  • 4 egg yolks

Instructions

  1. Puree  the blackberries, caster sugar and lemon juice in a food processor or using a hand blender.  You will have approximately 600 ml of puree depending on the juiciness of your blackberries.
  2. Whisk the egg yolks in a bowl until the mixture looks paler and resembles a mousse.
  3. Add the bay leaves to the cream and heat it to scalding point in a saucepan or in a microwave. Do not allow to boil – it will be the right temperature when you are just about able to bear to dip a finger in it.
  4. Pour the cream into the bowl containing the egg yolks and whisk all the time.
  5. Transfer the combined mixture into a bowl set over a pan of simmering water or, ideally a double-boiler, as you need to reheat it very gently.
  6. The mixture will gradually thicken until it looks like a custard (which is what it is).  Stir regularly to make sure it does not stick while it is thickening.
  7. Remove the thick custard from the heat and transfer into a bowl.  Do not remove the bay leaves from the custard yet.  They will continue to impart their flavour while the custard cools.
  8. Add approximately two thirds (400 ml) of your blackberry puree to the custard.
  9. Allow to cool to room temperature and then transfer to the fridge to become thoroughly chilled.
  10. When you are ready to make the ice-cream, remove the bay leaves and transfer the ice cream mixture to your ice cream maker and use according to your machine’s instructions.  If you do not have an ice cream maker, you can place the mixture in a freezer-proof container, put in the freezer for several hours until half-frozen.  Whisk the mixture and then return to the container and replace in the freezer until totally frozen.
  11. When the ice cream is almost set, stir in the remaining one third of the blackberry puree so that it forms a “ripple” through the ice cream.

Raspberry Clafoutis

Easy Raspberry Clafoutis recipe

Raspberry Clafoutis is an easy dessert recipe consisting of fresh raspberries set in a creamy set custard. It is a bit like a thick pancake, made with a rich batter, but studded with fresh raspberries. It is simple to make and can be eaten either warm or at room temperature. If you have an left-over clafoutis, it is a good addition to a picnic or a lunch-box.

Clafoutis is a French dessert which is traditionally made with fresh black cherries. However, the basic concept can be adapted for use with lots of other types of fruit. I particularly like to use raspberries because they have a sharpness which goes well with the creamy richness of the batter. However, you can use apricots, peaches, plums or apples and pears in a clafoutis.

Raspberry Clafoutis

What you need to know about Raspberry Clafoutis

  • You can make clafoutis in any kind of shallow oven-proof dish. I used a round, shallow cast-iron dish. However, you can use a ceramic or glass dish of any shape as long as it is oven-proof. However, whatever kind of dish you use, it is really important to grease it thoroughly (step 2) to stop your clafoutis sticking when you try and get it out!
  • When you add the raspberries to the dish (step 3) make sure that they are evenly distributed. Where you place them at this stage is pretty much where they will be in the finished dish.
  • You can use any kind of raspberries in this dish. You can also use other berries if you wish or a mixture of berries. Loganberries, boysenberries or blueberries are good options. It is best to avoid using berries that need to be sweetened such as gooseberries.
  • I make my custard with double cream (step 4) because I like the richness with the sharpness of the raspberries. However, if you want to make this dish a bit lighter (and healthier) you could use milk or a combination of half milk and half cream.
  • I flavour the custard with vanilla. I think it is important to do this as it really adds to the flavour of the finished dish. As an alternative, you could add a little almond essence.
  • When you add the custard to the dish (step 5) you can pour it over the back of a spoon which will make the flow gentler and help to stop it disturbing your carefully-placed raspberries.
  • The clafoutis will rise up when it is in the oven and then deflate as it cools. If you want to it to look at its most impressive, serve it immediately it is cooked. The slightly deflated look is normal and the taste is good whether you eat it hot or at room temperature.
Clafoutis

Loved this recipe? Checkout the Recipe Index.

Other easy desert recipes

If you are looking for other easy, make-ahead desserts, particularly those which are not too heavy, you might like some of the following recipes.

  • Pavlova is the perfect make-ahead impressive dessert and I have lots of recipes for different kinds including basic Strawberry Pavlova plus various such as Cranberry Pavlova, Lemon Pavlova and Rose and Raspberry Pavlova.
  • If you want something simpler, Meringues are a good option. If, like me, you like floral flavours, you might like my Rose Meringues.
  • Cheesecake is another good easy option and I am particularly keen on citrus flavours such as my Lime Cheesecake
  • Banoffee Pie is a great recipe to make with children who are generally enthused by the combination of banana and caramel!
  • A good option when there are lots of berries in season is Summer Pudding which is a traditional old-fashioned pudding which is great with a dollop of cream!
Print
clock clock iconcutlery cutlery iconflag flag iconfolder folder iconinstagram instagram iconpinterest pinterest iconfacebook facebook iconprint print iconsquares squares iconheart heart iconheart solid heart solid icon
Raspberry Clafoutis

Raspberry Clafoutis

5 Stars 4 Stars 3 Stars 2 Stars 1 Star 5 from 1 review
  • Author: Tastebotanical
  • Prep Time: 10
  • Cook Time: 30
  • Total Time: 40 minutes
  • Yield: Serves 6
  • Category: Dessert

Description

Raspberry Clafoutis is a simple dessert recipe which consists of fresh raspberries set in a creamy baked custard.


Ingredients

Scale
  • A little butter
  • 170 g (6 oz) fresh raspberries
  • 80 g (3 oz) plain flour
  • 3 eggs
  • 250 ml (8 fl oz) cream 
  • 100 g (4 oz) caster sugar
  • 1 teaspoon vanilla extract

Instructions

  1. Set your oven to 180 C, 400 F or Gas Mark 4.

  2. Grease an oven-proof dish with a little butter.
  3. Place the fresh raspberries in the dish.  Make sure that they are evenly distributed.
  4. Sift the flour into a bowl.  Add the three eggs and stir to combine.  Gradually add the cream.   Finally, add the caster sugar and the vanilla extract.
  5. Gently pour the custard mixture over the raspberries in the oven-proof dish.
  6. Put the dish in the oven and cook for 30 minutes.   
  7. Remove the dish from the oven.   Eat immediately or set allow to cool if you wish to eat the clafoutis at room temperature.

This recipe has been shared on #CookBlogShare with Peachicks Bakery and #Fiesta Friday with Fiesta Friday  and  Liz @ Spades, Spatulas & Spoons

Clafoutis

Loved this recipe? Checkout the Recipe Index.

Cherry Ice Cream

Home-made Cherry Ice Cream

This easy Cherry Ice Cream recipe uses juicy fresh cherries which are roasted with kirsch for extra flavour. They are then mixed with a creamy custard base to make a deliciously rich ice cream.

This is a great ice cream to make in July and August when fresh cherries are in season and widely available. I particularly like the large, sweet black cherries but you can use any kind of fresh cherry in this recipe. As with every recipe, the tastier the ingredients, the tastier the dish. I would recommend eating one (or maybe more than one) of the cherries that you plan to use in this ice cream to check the flavour.

What makes this ice cream particularly good is that the cherries are roasted, with kirsch, in order to concentrate their flavour. Not only do the cherries taste pretty good, the process produces a delicious alcohol-infused juice which flavours the ice cream. I also love the colour of this ice cream which is a beautiful soft pink if made with black cherries.

If you have a few too many fresh cherries, you may also like my Cherry Tart.

Cherry Ice Cream

What you need to know about making ice cream with fresh cherries

  • Although you can make this recipe without an ice cream maker, it is a lot easier if you have one. You can buy a basic ice cream maker fairly cheaply.
  • It is best to start this recipe the day before you eat it. This will mean that once you have made the basic custard, it will have time to chill down before you put it in the ice cream maker the next day.
  • You can also make this ice cream well in advance if that is more convenient. I generally make double the quantity and keep it in the freezer where it will last for up to three months.
  • As with most home-made ice creams, it helps to remove the container from the freezer about ten minutes before serving as this will make it easier to scoop.
  • You can use any kind of cherries to make this ice cream. However, make sure that they are sweet and full of flavour. The best way to check this is by eating one! The better the flavour of your cherries, the better the flavour of your ice cream.
  • Roasting the cherries (step 2) makes a huge difference to the taste of the finished ice cream as it intensifies the taste of the cherries. Leaving the stones in when you roast the cherries adds an additional almond flavour to the ice-cream. It is also easier to remove the stones when the cherries have been roasted. It is really important to cover the dish in which you roast the cherries to stop the delicious juices evaporating. These juices are just as important as the flesh of the cherries in bringing flavour to your ice cream.
  • I generally add a dash of kirsch, a cherry-based spirit, when I roast my cherries. However, if you don’t want to include alcohol, that is fine. Just leave it out – the ice cream will still taste good! Also, if you want to choose a different type of spirit, that is fine too. Good alternatives would be brandy, cherry brandy or port.
  • This recipe produces a very rich Cherry Ice Cream which means a little goes a long way. Keep the portions small – people can always have seconds.
  • I think this Cherry Ice Cream is pretty good just served on its own. However, a spoonful of cherry compote would be a good addition. Also, cherry and chocolate is a good flavour combination so a little grated, chunked or curled chocolate – particularly dark chocolate – would be a good addition. Similarly, a scoop of rich chocolate ice cream would go well with this ice cream.

Loved this recipe? Check out the Recipe Index?

Other home-made ice cream recipes

I am a great home-made ice cream enthusiast. I make it in the summer, of course, but am happy to eat it in winter too! There are some brilliant, shop-bought ice creams available but it is so easy to make your own. I like to experiment with flavours and some of my other recipes are listed below.

  • Coffee Ice Cream – quick and easy, store-cupboard recipe using instant coffee which has an amazingly rich coffee flavour
  • Cranberry Ice Cream – if you have any left-over cranberry sauce, you know what to do with it
  • Elderflower Ice-cream – easy recipe using elderflower cordial – delicious floral taste of summer!
  • Lavender Ice-cream – another gorgeous floral ice cream (bit of a theme here at tastebotanical…) made with fresh or dried culinary lavender
  • Lemon Curd Ice Cream – this tangy, three-ingredient recipe is probably the simplest ice cream recipe you will find
  • Rose Ice-cream – made with culinary rosewater, this ice cream is the essence of an English summer garden
  • Strawberry Balsamic Ice-cream – strawberry ice cream given a lift with a dash of balsamic vinegar to bring out the sweetness
  • Thyme ice-cream with honey and mascarpone – thyme, honey and mascarpone…. in an ice cream – what’s not to like?

Print
clock clock iconcutlery cutlery iconflag flag iconfolder folder iconinstagram instagram iconpinterest pinterest iconfacebook facebook iconprint print iconsquares squares iconheart heart iconheart solid heart solid icon
Cherry Ice Cream

Cherry Ice Cream recipe

5 Stars 4 Stars 3 Stars 2 Stars 1 Star 5 from 4 reviews
  • Author: Tastebotanical
  • Prep Time: 15
  • Cook Time: 45
  • Total Time: 1 hour
  • Yield: Serves 6
  • Category: Ice Cream
  • Cuisine: English

Description

This easy and delicious ice cream is made with fresh cherries, roasted with kirsch, mixed into a creamy custard base.


Ingredients

Scale
  • 350 g (12 oz) fresh cherries
  • 2 tablespoons sugar
  • 2 tablespoons of kirsch (optional)
  • 4 egg yolks
  • 85 g (3 oz) caster sugar
  • 425 ml (15 fl oz) double cream
  • 1 teaspoon vanilla extract

Instructions

  1. Set your oven to 180 C, 400 F or Gas Mark 4.
  2. Place the fresh cherries in an oven-proof dish.  You do not need to remove the stones at this stage.  Sprinkle with the 2 tablespoons of sugar and the kirsch you wish to use it.  
  3. Cover the oven-proof dish with foil or a lid.  Put in the oven for 30 minutes.   Then remove from the oven and set aside while the cherries cool sufficiently for them to be handled.  
  4. Remove the stones from the cherries and then finely chop the flesh of the cherries.
  5. Whisk the egg yolks with the sugar in a bowl until the mixture looks paler and resembles a mousse.
  6. Heat the cream to scalding point in a saucepan or in a microwave. Do not allow to boil – it will be the right temperature when you are just about able to bear to dip a finger in it.
  7. Pour the cream into the bowl containing the egg yolks and sugar, whisking all the time.
  8. Transfer the combined mixture into a bowl set over a pan of simmering water or, ideally a double-boiler, as you need to reheat it very gently.
  9. The mixture will gradually thicken until it looks like a custard (which is what it is).  Stir regularly to make sure it does not stick while it is thickening.
  10. Remove the thick custard from the heat and transfer into a bowl.  
  11. Add the vanilla extract and the chopped cherries and any juice that has accumulated in the oven-proof dish while they were roasting.
  12. Allow to cool to room temperature and then transfer to the fridge to become thoroughly chilled.
  13. When you are ready to make the ice-cream, transfer to your ice-cream maker and use according to your machine’s instructions.  If you do not have an ice-cream maker, you can place the mixture in a freezer-proof container, put in the freezer for several hours until half-frozen.  Whisk the mixture and then return to the container and replace in the freezer until totally frozen.

This recipe has been shared on #CookBlogShare with Recipes Made Easy  and #Fiesta Friday with Fiesta Friday 

Cherry Ice Cream

Loved this recipe? Check out the Recipe Index?

Rose Petal Jam

Rose Petal Jam with Fresh Rose Petals

Rose Petal Jam is sweet rose-scented heaven! I love floral flavours, particularly rose. They taste wonderful but there is also something romantic and exotic about edible flowers.

I love travelling and one of my favourite places to visit is Morocco. I have had many trips there over the years and have wonderful culinary and cultural memories! Morocco is known for its wonderful roses and rose petals and rose water are used in both sweet and savoury dishes. The province of Ouarzazate, south-east of Marrakesh, is the centre of rose production. Each year in early May in El Kelaa M’Gouna, a small town in the Moroccan “Valley of Roses” there is a Rose Festival to celebrate the annual harvest.

Making Rose Petal Jam reminds me of Moroccan breakfasts and exploring a different culture. However, it also makes me of my own home. I make it using roses from my garden in Gloucestershire and, sometimes, from wild roses that flower in June and July along my regular dog-walking routes.

Rose Petals

What you need to know about Rose Petal Jam

  • What does it taste like? Well, the quick answer is that it tastes of eating roses! It is a sweet, semi-set jam. The petals are not generally removed, although you can do this if you wish, so it has a bit of texture to it too. The long answer is that it tastes of memories, exotic places and also of home (see above!).
  • How do I use it? It is pretty versatile. I’ve listed a few of the ways that I use it below to offer some inspiration!
    • First off, you can use it, as you would any jam, spread on bread and butter for breakfast or as an afternoon snack.
    • It is also great as an accompaniment to cheese. Use it as you would a chutney with hard mild cheese, such as Lancashire or Wensleydale. Drop a spoonful over soft cheese such as ricotta or a good cream cheese. Or drizzle it over fried haloumi.
    • It is also good stirred into plain Greek yogurt or with vanilla ice cream.
    • If you are making pancakes, a dollop of rose petal jam, and maybe a spoonful of whipped cream, will make them taste sublime.
    • It also is a good addition to many plain pudding recipes. Stir it into rice pudding, add it to bread and butter pudding or use a spoonful, together with some whipped cream, to sandwich a pair of meringues.
    • It is good as a filling for cakes, particularly Victoria-sandwich style cakes.
Rose Petal Jam
How do you make it?

It is really quick and easy to make Rose Petal Jam. It takes only 20 minutes and the list of ingredients is very short.

  • The time to make this jam is in the summer when the roses, in your garden or in the hedgerows, are in full bloom. Choose new open flowers – rose buds and older roses that are going brown are not as good. It is best to pick them on a sunny day as the flavour will be stronger. Choose fragrant varieties. The stronger the scent of the roses, the stronger the flavour of the resulting jam.
  • As with all edible flowers, you need to make sure that those that you are gathering have not been treated with any chemicals. Do not ever use roses from a florist as they are very likely to have been chemically treated.
  • There are two views regarding preparation of rose petals for culinary use.The first is that you should not wash the petals s as this will impact the flavour and you should just shake the flowers and pick through them to remove any insects. The second is that the blooms need to be washed to remove the bugs, and any dirt, regardless of any reduction in flavour. I tend towards the “no-wash” view when making this jam but the choice is yours.
  • It is vital to add pectin to this jam (step 5) as your jam will not set without it and it does not occur naturally in rose petals!
  • This jam will keep for around three months. Once you have opened the jar, you should keep it in the refrigerator.

Rose Petal Jam

Loved this recipe? Checkout the Recipe Index.

Other rose-flavoured recipes

I love the flavour of rose and rose geranium. If you are inspired by my Rose Petal Jam, you might like some of my other rose-flavoured recipes.

Loved this recipe? Checkout the Recipe Index.

Rose Petal Jam

Home-made Rose Petal Jam recipe

Print
clock clock iconcutlery cutlery iconflag flag iconfolder folder iconinstagram instagram iconpinterest pinterest iconfacebook facebook iconprint print iconsquares squares iconheart heart iconheart solid heart solid icon
Rose Petal Jam

Rose Petal Jam

5 Stars 4 Stars 3 Stars 2 Stars 1 Star 5 from 2 reviews
  • Author: Tastebotanical
  • Prep Time: 5
  • Cook Time: 15
  • Total Time: 20 minutes
  • Yield: 1 large jar 1x
  • Category: Jam
  • Cuisine: English

Description

This delicious jam is made from fresh rose petals and has an amazing floral taste.


Ingredients

Scale
  • 250 ml (8 fl oz) water
  • 450 g (1 lb) caster sugar
  • 50 g (2 oz) fresh rose petals
  • 100 ml (3 fl oz) pectin
  • Juice of half a lemon

Instructions

  1. Put the water and sugar in a heavy-based pan.   Heat gently until the sugar has dissolved.
  2. Check that the rose petals are free from insects.   You can wash your petals if you wish.   However, to ensure a stronger flavour, it is better not to wash them.
  3. Add the rose petals to the saucepan containing the water and sugar.
  4. Bring the mixture to the boil and then simmer for 10 minutes.
  5. Add the lemon juice and pectin and then pour the mixture into a sterilised jam jar.   Cover with a lid and allow to cool.

Notes

You can sterilise your jam jar by washing it in warm, soapy water, rinsing well and then drying off for 15 minutes in an oven set at 140C/120C fan/gas 1.

This recipe has been shared on #CookBlogShare with Curly’s Cooking  and #Fiesta Friday with Fiesta Friday and  Mollie @ Frugal Hausfrau

Rose Petal Jam

Loved this recipe? Checkout the Recipe Index.