Rhubarb Crumble

Rhubarb Crumble with Star Anise

This easy Rhubarb Crumble is an extremely simple traditional English pudding. What makes this recipe special is the addition of star anise which gives it a wonderful mild aniseed flavour which goes brilliantly with the sweet-sour rhubarb.

In praise of fruit crumble

I am a big fan of fruit crumbles. They are pretty much fool-proof, can use a range of different fruit depending on the season and what is available and, like this one, it is really easy to add a unique flavour twist with a bit of spice. They are also the perfect make-ahead dessert and are very versatile as they can be eaten cold, at room-temperature or hot from the oven. Just add a dollop of custard, cream or ice-cream and you have the perfect warming, comforting pudding.

I make Apple Crumble all year around but, in spring and early summer, Rhubarb Crumble is my favourite. This is largely because I have a very large rhubarb plant in my garden. We inherited it when we moved into our current house and for many years I tried to get rid of it as it is literally in the middle of our main flower bed. Also, at that point, it was not something I particularly wanted to cook or eat. The giant rhubarb plant stubbornly resisted all my attempts to kill it and gradually I gave in and decided to try and cook with it. Now it is one of my favourite ingredients and I actively look forward to rhubarb season. In addition to crumble, I also make lots of other rhubarb recipes including Rhubarb Gin, Rhubarb Fool, Rhubarb Compote, Rhubarb Roulade, Rhubarb Jam and Rhubarb Curd.

Rhubarb

Things you need to know about Rhubarb Crumble

As with all crumbles, it is very easy to make. You do not need to cook the rhubarb in advance. You simply wash and cut up the rhubarb stalks and add them to the dish.

A basic Rhubarb Crumble recipe is very simple to make but there are lots of ways that you can make it a bit different.

  • In this recipe, I add star anise to provide a bit of flavour enhancement. Other spices that you could add include cardamon (1 teaspoon of ground cardamon powder or 3 cardamon pods), ginger (1 teaspoon of ground ginger) or vanilla (1 teaspoon of vanilla extract).
  • Orange is also a great flavour partner to rhubarb so adding the zest and juice of a small orange to the rhubarb pieces is also a great way to enhance your crumble.
  • A scattering of almonds (or hazelnuts or pine nuts) on top of the crumble topping is also a very good addition. Add them five minutes before the end of the cooking time so that they will be toasted but not burnt.

What is star anise?

Star anise is a spice, shaped like a five-pointed star, which is made from the fruit of the Chinese evergreen tree Illicium verum. It is one of the most popular spices used in Chinese cooking and provides the dominant flavour in Chinese five spice powder. It is also widely used in Indian, Malaysian and Indonesian dishes. I think the star shaped seed pods are pretty but they are quite large and hard so using ready ground Star Anise powder, or grinding it yourself, is a good option. It adds an aniseed flavour to food and, in addition to rhubarb, is a good flavour partner with roast meat, especially pork and duck and in curries. In fact, it is most widely used in savoury, rather than sweet, recipes.

Print
clock clock iconcutlery cutlery iconflag flag iconfolder folder iconinstagram instagram iconpinterest pinterest iconfacebook facebook iconprint print iconsquares squares iconheart heart iconheart solid heart solid icon
Rhubarb Crumble

Rhubarb Crumble with Star Anise

  • Author: Tastebotanical
  • Prep Time: 15
  • Cook Time: 35
  • Total Time: 50 minutes
  • Yield: Serves 6
  • Category: Pudding
  • Method: Baking
  • Cuisine: English

Description

This easy recipe takes traditional Rhubarb Crumble to a new level with the addition of star anise which provides a subtle aniseed flavour.


Ingredients

Scale
  • 4 stems of fresh rhubarb
  •  6 tablespoons of caster sugar
  • 1 teaspoon of ground star anise or 3 whole star anise pods
  • 175 g butter or vegetable fat
  • 350 g plain flour
  • 175 g caster sugar
  • Flaked almonds


Rhubarb


Instructions

  1. Set your oven to 180 C, 400 F or Gas Mark 4.
  2. Wash your rhubarb stems and then cut them into 1 cm lengths.
  3. Put the rhubarb pieces in a baking dish (20 cm x 28 cm).  Sprinkle with caster sugar.  You will need approximately one and a half tablespoons of sugar for each rhubarb stem.  If you are wary of the sourness of rhubarb, you can add two tablespoons of sugar for each stem.
  4. If you are using ground star anise sprinkle it over the rhubarb. If you are using whole star anise seedpods add them to the dish.  You will get a milder flavour if you are using the whole seedpods.  You will also need to let people know that they are there!
  5. Next make the crumble topping.  Put the 350 g flour and 175 g butter (or vegetable fat) in a bowl and “rub in” using your fingers,  or use a food processor, until the mixture looks like fine breadcrumbs.  Then stir in the 175 g of caster sugar.
  6. Pour the crumble topping on top of the rhubarb.
  7. Place the baking dish in the oven and cook for 35 minutes.
  8. If you wish, you can sprinkle some flaked almonds on top of the crumble for the final 5 minutes that it is in the oven.  They should get brown and toasted (but not burnt) if they are added at this stage.

Rhubarb Crumble


Keywords: rhubarb, crumble, star anise, dessert, pudding, recipe

This recipe has been shared on #CookBlogShare with Lost in Food Feast Glorious Feast, and #Fiesta Friday with Fiesta Friday, Mollie@FrugalHausfrau and Liz@Spades, Spoons and Spatulas

Loved this recipe? You may also like the following recipes. Or checkout the Recipe Index.
Apple crumble
Apple Crumble
Rhubarb Roulade
Rhubarb Roulade
Bottles of rhubarb gin
Rhubarb gin

Roasted Pepper Salad

Roasted Pepper Salad – an easy five-ingredient recipe

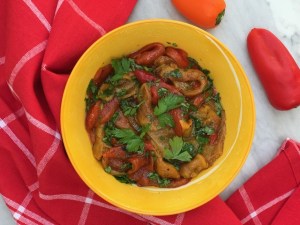
This Roasted Pepper Salad is a very simple vegan recipe which showcases the rich, sweet taste of roasted peppers.   I think that sometimes less is more and that it is good to pick on one star ingredient and add a few others that really bring out its flavour. In this case, garlic, a citrus dressing and parsley transform the roasted peppers into a salad within minutes.

How I learned to love peppers

Making this recipe changed me from a pepper-hater to a pepper-lover in one bit. My previous experience of peppers had not been positive. When I was growing up, adding raw peppers to a green salad was a popular way of adding a bit of colour. It looked pretty but the taste of raw pepper did nothing for me. In fact it still doesn’t. My other early pepper-related experiences involved the stuffed peppers which were occasionally served for school lunches. And the less said about them, the better.

However, inspired by a delicious pepper pasta sauce that a friend cooked for me when I was a student, I realised that the key to pepper-eating bliss was to roast them! Roasting, either on a griddle, under a grill, in the oven or on a barbecue has a transformative effect on peppers. They become soft and savoury with a delicious smoky sweetness. All that is needed to transform them into a salad is a citrus dressing, a bit of garlic, parsley and some seasoning.

If you like this recipe, you might also like my recipe for Feta Quiche With Roasted Peppers.

Roasted Pepper Salad

So why is this such a great salad?

Roasted Pepper Salad is one of my favourite salads – and not just for the taste! First off, it is very simple – only five ingredients including seasoning – and it is fool-proof to make (no fancy culinary skills required). Secondly, it is healthy. Roasting retains the flavour and nutritional value of the peppers and the calorie count is low (if you care about that sort of thing…). Finally, it is an extremely easy-going and versatile salad. You can make it a day or so in advance. It keeps in the fridge for several days. It can be served warm or at room temperature or cold. You can pimp it up with other ingredients – pine nuts for a bit of crunch, capers, olives, anchovies or some salty cheese such as feta are all good additions. Or you can just leave it simple. It is a fantastic side dish. I will also have it for lunch with just some crusty bread or maybe a green salad. It is such a great roasted pepper recipe!

Other easy salads

I love salads and eat them all the year around – not just in summer. If you like this Broad Bean Salad recipe, you might also like some of my other salad recipes.

Roasted Pepper Salad recipe

Print
clock clock iconcutlery cutlery iconflag flag iconfolder folder iconinstagram instagram iconpinterest pinterest iconfacebook facebook iconprint print iconsquares squares iconheart heart iconheart solid heart solid icon
Roasted Pepper Salad

Roasted Pepper Salad

  • Author: Tastebotanical
  • Prep Time: 10
  • Cook Time: 10
  • Total Time: 20 minutes
  • Yield: for 6 people 1x
  • Category: Salad
  • Cuisine: English

Description

This is a very simple vegan salad which showcases the rich, sweet taste of roasted peppers.


Ingredients

Scale
  • 6 red,orange or yellow peppers
  • 1 clove of garlic (crushed)
  • 1 tablespoon of olive oil
  • Juice from half a lemon
  • Salt and pepper
  • Small bunch of fresh parsley

Peppers


Instructions

  1. Cut the peppers in half lengthwise.  Remove the stalks and seeds.
  2. Place the pepper halves skin-side up on a grill pan covered in foil.
  3. Place the pan under a hot grill for around 10 minutes until the peppers are black and charred.
  4. Wrap the silver foil that you used to line the pan around the peppers and leave to cool.  The foil will form an envelope around the hot peppers and the steam that they give off will help to loosen their charred skins.
  5. When the peppers are cool enough to handle you should be able to peel off the charred skins.
  6. Roughly chop the skinned peppers and place in a bowl.
  7. Add the crushed garlic clove, olive oil and lemon juice to the peppers.  Season to taste with salt and pepper.
  8. Chop the fresh parsley and sprinkle over the peppers.

Roasted Pepper Salad


Notes

Good things to add to this salad include pinenuts, capers, olives, anchovies, salty cheese such as feta.

You can serve this salad hot, warm, room-temperature or cold.

You can make this salad a day ahead.  It will also keep in the fridge for several days.

Keywords: peppers, salad, vegan

Lemon Sponge Cake with Edible Flowers

Lemon Sponge Cake with Elderflower and Edible Flowers

This lemon sponge cake, flavoured with elderflower cordial and decorated with edible flowers, is the perfect show-stopper for a spring celebration. I bring it out for Mothers’ Day and Easter and also for spring birthdays.

There are lots of things that I love about this cake. First off, it is delicious! Lemon and elderflower are great flavour partners. Secondly, it is really easy to make. It is just a simple lemon sponge, perked up with the fantastic floral taste of elderflower cordial, sandwiched with lemon curd and covered in simple lemon and elderflower buttercream. It is also really easy to decorate. You do not need any icing or cake-decoration skills to produce a really striking cake. It is a doddle to cover the cake with the buttercream. Then all you have to do then is to get creative and add the fresh edible flowers. If there are any bits of the icing that are less than perfect, just cover them up with a flower!

As with all sponge cakes, this cake is best if it is eaten as soon as possible. You can make it a day ahead but any longer than that and it won’t be as good. However, you can make the sponge cakes and then freeze them if that makes things easier. After they have cooled, wrap in cling film and put in the freezer. When you are ready to use, allow to defrost and then sandwich them together, add the icing and decorate.

I make my own lemon curd and elderflower cordial and you can find recipes on this blog. However, there is absolutely no need to do this. A good quality shop-bought lemon curd is fine to sandwich the cakes together and there are lots of great ready-made brands of elderflower cordial. Having said that, it is really fun to make your own if you have time!

Using edible flowers – what you need to know

As you might have worked out from the name of my blog, I love using edible flowers. For someone who really appreciates the visual impact of the food that they eat, but has little decorative skill (piping sugar roses really is not my thing), edible flowers are the perfect ingredient. If you have never used edible flowers before, this is what you need to know.

  • There are many varieties of flower that are edible. There are also many that are not either because they don’t taste very nice or because they are harmful if eaten. It is vital that you know what varieties of flowers you can use in your cooking. If in doubt, don’t use it!
  • Similarly, you need to be sure that the flowers that you are using have not been treated with any chemicals (pesticides or fertilisers) that might be harmful to you. The best way to be sure of this, is to obtain your flowers from a location that you know to be safe such as your own garden. Alternatively, you can now buy edible flowers from suppliers such as Ocado or Fine Food Specialist. Do not use flowers from the florist as they will often be chemically treated to prolong their life.
  • Broadly speaking, edible flowers fall into three categories. Firstly, there are flowers that are primarily decorative. They include lilac, primroses, violas and pansies. Secondly, there are flowers that are decorative but also provide a flavour. These include roses, lavender, elderflowers and dandelions which are generally used in sweet recipes and the flowers of many herbs, such as chives or thyme, which are generally used in savoury recipes. Thirdly, there are flowers which actually form part of the dish. These include peppery nasturtiums which can liven up a salad or courgette flowers which can be stuffed and then either fried or steamed.
  • Before you use your edible flowers, you need to make sure that they are clean. I soak mine in a bowl of cold water for around 10 minutes and then let them dry out on a clean kitchen towel for a further 5 minutes.
  • If you are using edible flowers to decorate a cake, you need to add them just before you are ready to serve it up. This is because the flowers will only keep fresh for a few hours once they have been stuck to the cake. I will keep my decorative flowers in a bowl of water until just before I need to use them. They keep fresh for a couple of days if kept in a bowl of water.
Other recipes using edible flowers

If you would like to explore using edible flowers, I have a lot of recipes that use them for decoration and flavour.

Print
clock clock iconcutlery cutlery iconflag flag iconfolder folder iconinstagram instagram iconpinterest pinterest iconfacebook facebook iconprint print iconsquares squares iconheart heart iconheart solid heart solid icon
Lemon Sponge Cake with Edible Flowers

Lemon Sponge Cake with Elderflower and Edible Flowers

  • Author: Tastebotanical
  • Prep Time: 25
  • Cook Time: 35
  • Total Time: 1 hour
  • Yield: Serves 810 1x
  • Category: Cake
  • Method: Baking
  • Cuisine: English

Description

This Lemon Sponge Cake, flavoured with elderflower cordial and decorated with edible flowers, is probably the easiest show-stopping cake you will find!


Ingredients

Scale

For the cake

  • 450 g butter
  • 450 g caster sugar
  • 8 eggs
  • 400 g self-raising flour
  • 50 g cornflower
  • 2 teaspoons baking powder
  • 3 tablespoons milk
  • 3 tablespoons elderflower cordial
  • Grated zest of 1 lemon

For the decoration

  • 250 g butter
  • 500 g icing sugar
  • Juice of 1 lemon
  • 2 tablespoons of elderflower cordial
  • 8 tablespoons of lemon curd
  • Edible flowers (primroses, pansies, roses)

You will also need three 18 cm loose-bottomed sandwich tins.


Instructions

  1. First make your cakes. Set your oven to 180 degrees centigrade or Gas Mark 4.
  2. Cream the butter with the sugar.  (I usually soften the butter for about 30 seconds in the microwave first as it makes it much easier.)
  3. Gradually add the eggs to the butter and sugar mixture.  If it looks as if it is going to curdle, add some of the self-raising flour.
  4. Once the eggs have been incorporated add the rest of the self-raising flour and the cornflower.
  5. Add the milk, elderflower cordial and the grated lemon zest.
  6. Grease your Victoria Sandwich tins or containers and then add the cake mixture.
  7. Bake your cakes in the oven for around 35 minutes.  They are done when they are golden brown, springy to the touch and have shrunk away from the edge of the tin.  You can test this by inserting a skewer in the middle of the cake – if it comes out cleanly with no mixture attached, your cake is done.
  8. Allow your cakes to cool on a rack before removing them from the tins or containers. 
  9. Next prepare the icing and decoration. Beat the butter and icing sugar together in a food processor or using a hand blender.  Add the lemon juice and elderflower cordial and beat until the mixture is pale and smooth.
  1. Spread 4 tablespoons of lemon curd on top of one of the cakes.  Place the second cake on top of it.  Spread 4 tablespoons of lemon curd on top of the second cake.  Place the third cake on top of it.
  2. Spread the lemon buttercream over the top and sides of the cake.  
  3. Decorate with edible flowers.  


Notes

  1. Make sure that you are using varieties of flower that are safe to eat and that they have not been chemically-treated.  Wash flowers before  use.

Keywords: cake, lemon, elderflower, edible flowers

This recipe has been shared on #CookBlogShare with Feast Glorious Feast, and #BakingCrumbs with Apply To Face Blog and #Fiesta Friday with Fiesta Friday and Liz@Spades, Spoons and Spatulas

Loved this recipe? You may also like the following recipes. Or checkout the Recipe Index.

Apple Crumble Recipe

Basic Apple Crumble Recipe

This basic Apple Crumble recipe is the perfect introduction to classic English puddings and pudding-making in general. It is very quick and easy to make, can be produced a day ahead and is great either hot from the oven or at room temperature. Pretty much everyone loves apple-based desserts – from apple pie to baked apples – so it is a guaranteed crowd-pleaser too. I love to eat it with a drizzle of double cream but you can also eat it with custard, which is probably more traditional, or with a good vanilla ice cream.

I use only cooking apples in my crumble. These are apples which will disintegrate to a mush when cooked so that you have a thick apple puree at the base of your crumble. Eating apples will retain some firmness when cooked. If you want a bit more texture to your crumble, you can use a combination of half cooking apples and half eating apples. In my view, just using eating apples for a crumble doesn’t really work as they do not give that soft, thick apple sauce that you need for this kind of pudding. Keep the eating apples for deserts such as tarte tatin where you want your apples to keep their shape.

The only flavouring, apart from apples, is cinnamon which is a classic flavour companion. The smell of warm cinnamon-spiced apples is guaranteed to make you feel warm and cosy on a cold winter’s day.

Print
clock clock iconcutlery cutlery iconflag flag iconfolder folder iconinstagram instagram iconpinterest pinterest iconfacebook facebook iconprint print iconsquares squares iconheart heart iconheart solid heart solid icon
Apple crumble

Apple Crumble Recipe

  • Author: Tastebotanical
  • Prep Time: 10
  • Cook Time: 30
  • Total Time: 40 minutes
  • Yield: Serves 6
  • Category: Pudding
  • Method: Baking
  • Cuisine: English

Description

This basic Apple Crumble recipe is a classic English pudding which brings together cinnamon-flavoured apples with a crisp, buttery topping.


Ingredients

Scale
  • 1 kg cooking apples (eg Bramleys)
  • 25 to 50 g caster sugar 
  • A little ground cinnamon
  • 175 g butter or vegetable fat
  • 350 g plain flour
  • 175 g caster sugar
  • Pinenuts or flaked almonds

Apple Crumble


Instructions

  1. Set your oven to 180 C, 400 F or Gas Mark 4.
  2. Peel and core the cooking apples.  Cut into pieces of approximately 1 cm.
  3. Put the apple pieces in a large baking dish (20 cm x 28 cm).  Sprinkle with caster sugar.  You will need between 25 g and 50 g.  The amount of sugar depend on the sourness of the apples and also how sweet you like your crumble.  You can taste a piece of the apple to see how sour it is.   Add a little ground cinnamon.
  4. Next make the crumble topping.  Put the 350 g flour and 175 g butter (or vegetable fat) in a bowl and “rub in” using your fingers,  or use a food processor, until the mixture looks like fine breadcrumbs.  Then stir in the 175 g of caster sugar.
  5. Pour the crumble topping on top of the apples.
  6. Place the baking dish in the oven and cook for 30 minutes.
  7. If you wish, you can sprinkle some pinenuts or flaked almonds on top of the crumble for the final 5 minutes that it is in the oven.  They should get brown and toasted (but not burnt) if they are added at this stage.

Apple Crumble


Notes

You can eat your crumble hot from the oven or at room temperature.  I think it is best at room temperature, not a traditional view (!), as it brings out the flavours of apple and cinnamon.

This recipe has been shared on #CookBlogShare with Apply to Face Blog and #FiestaFriday with Fiesta Friday 

Loved this recipe? You may also like the following recipes. Or checkout the Recipe Index.