Easy Apple Cake

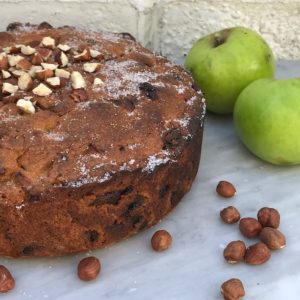
Easy Apple Cake – perfect for early autumn!

This Easy Apple Cake combines sharp cooking apples with toasted hazelnuts and brandy-soaked sultanas. It is a versatile cake which can be eaten with morning coffee or afternoon tea but also makes a great pudding, particularly if served warm with cream or ice-cream!

I have a Bramley apple tree in my garden which means that in late August and early September I get a huge over-supply of cooking apples. This is the season for all things apple – Apple Crumble, Apple Pie, Apple Sauce! I also get to work freezing the apples – I peel, core and chop them first – so that they can be used later on in the year. Although this is a bit laborious but I get the benefit later in the year when I have ready-to-use cooking apple chunks in the freezer to make a quick crumble or pie.

Until recently, despite the early autumn apple frenzy, the one thing I didn’t make was Apple Cake. This year, I decided to give it a go and, continuing on the autumnal theme, decided to add hazelnuts and sultanas.

Recent posts from tastebotanical

Loved this recipe? Checkout the Recipe Index.

And, if not apples…

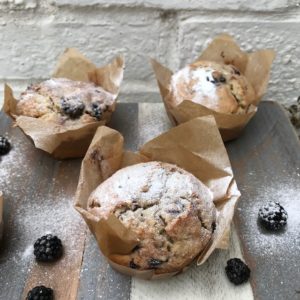
I always have renewed enthusiasm for cake baking (and eating) in autumn. There is something about the colder days and the abundance of delicious fruit, that get me back in the baking zone. If you are looking for other great autumn cake recipes, you might like Ginger and Pear Cake, Rum Banana Bread, Earl Grey Cake with Orange or even my Blackberry Muffins.

Easy Apple Cake recipe

Print
clock clock iconcutlery cutlery iconflag flag iconfolder folder iconinstagram instagram iconpinterest pinterest iconfacebook facebook iconprint print iconsquares squares iconheart heart iconheart solid heart solid icon
Apple Cake

Easy Apple Cake

  • Author: Tastebotanical
  • Prep Time: 20
  • Cook Time: 60
  • Total Time: 1 hour 20 minutes
  • Yield: 1 large cake 1x
  • Category: Cake
  • Method: Baking
  • Cuisine: English

Description

This is a fantastic cake to make during  early autumn which brings together sharp cooking apples, toasted hazelnuts and brandy-soaked sultanas.


Ingredients

Scale
  • 100 g sultanas
  • 1 tablespoon of brandy or apple brandy (or apple juice)
  • 225 g butter
  • 350 g self-raising flour
  • 2 teaspoons of cinnamon
  • 500 g cooking apples (eg Bramley)
  • 100 g of toasted hazelnuts (finely chopped)
  • 175 g caster sugar
  • 3 large eggs
  • a little white or brown granulated sugar (optional)

Apple Cake


Instructions

  1. Heat your oven to 180 C, 400 F or Gas Mark 4.
  2. Put the sultanas in a ceramic bowl and add the brandy or apple brandy.  Put in the microwave to heat for a few seconds and then set aside.  The sultanas will plump up as they absorb the alcohol.   If you do not want to use alcohol, you can use apple juice as a substitute.
  3. Grease a 20 cm loose-bottomed cake tin.  If your tin is not non-stick, line the base with a circle of grease-proof paper or baking parchment.
  4. Cut the butter  into small cubes and put it into a large bowl.  Sift in the flour and cinnamon.
  5. Rub the butter into the flour, either by hand or using a food processor, until it resembles fine breadcrumbs.
  6. Peel the cooking apples with a vegetable peeler, remove their cores and roughly chop.   
  7. Add the chopped apple,  plumped-up sultanas, chopped hazelnuts and sugar to the mixture.  Then stir in the eggs.
  8. Spoon the mixture into the cake tin.  Place it in the oven for one hour until it is golden and firm to the touch.
  9. Remove from the oven and allow to cool in the tin on a cooling rack.  You can sprinkle granulated sugar (white or brown) on the top of the warm cake to give it a crunchy topping.


Keywords: apple cake, apples,

Loved this recipe? Checkout the Recipe Index.

Loved this recipe? You may also like the following recipes. Or checkout the Recipe Index.

Blackberry Muffins

Home-made Blackberry Muffin recipe

These Blackberry Muffins are an English seasonal take on a traditional Blueberry Muffin. I love blackberries and thought that they might be a good alternative to blueberries in a muffin. They have a dark, sweet juiciness which is perfect in a light, sweet vanilla-flavoured muffin.

Muffins are very easy to make. It really is a question of mixing all the ingredients together, cooking for 20 minutes, and then enjoying your freshly baked muffins. The key to a good muffin, as well as having a good flavour combination, is to eat it when it is fresh. A warm muffin, just out of the oven, is truly sublime. A two-day old muffin, not so much!

I like to try and keep things seasonal, as much as I can, so I tend to make these Blackberry Muffins in late August and September when I can pick fresh blackberries. However, if I am organised enough, I pick lots of blackberries during the season as they freeze very well and can be used throughout the year. Also, nowadays, you can buy blackberries in most supermarkets.

I tend to serve muffins as a treat with morning coffee. I will sometimes take them into work or, if I’m working from home, will enjoy a solitary muffin and coffee break. Muffins are also great additions to lunchboxes for children or adults as they are fairly robust and don’t disintegrate into crumbs too easily!

Lovely cakes!

If you like these muffins, you may like some of the other cake recipes that I cook regularly. They are so quick and easy to make and you can get really creative with the flavours! On other pages of this blog you can find recipes for Rosemary Cake,  Thyme Cake, Earl Grey and Orange Cake,Lemon DrizzleBlood OrangeLime and CoconutRum and Banana and Ginger and Pear.

Print
clock clock iconcutlery cutlery iconflag flag iconfolder folder iconinstagram instagram iconpinterest pinterest iconfacebook facebook iconprint print iconsquares squares iconheart heart iconheart solid heart solid icon
Blackberry Muffins

Blackberry Muffins

  • Author: Tastebotanical
  • Prep Time: 10
  • Cook Time: 20
  • Total Time: 30 minutes
  • Yield: 12 large muffins 1x
  • Category: Muffins
  • Method: Baking
  • Cuisine: British

Description

Blackberry Muffins are quick and easy to make and are a great way of using this dark, juicy berry!  Eat them fresh out of the oven when they are still warm.


Ingredients

Scale
  • 100 g butter
  • 140 g golden caster sugar
  • 2 eggs
  • 200 ml Greek yogurt
  • 1 teaspoon vanilla extract
  • 2 tablespoons milk
  • 250 g plain flour
  • 2 teaspoons baking powder
  • 125 g blackberries (washed)

Blackberries


Instructions

  1.  Set your oven to 200 C/180F/Gas Mark 6.
  2. Line a 12-hole muffin tin.   
  3. Cream the butter and sugar together using a food-processor or hand-held beater.
  4. Add the eggs, yogurt, vanilla essence and milk and stir to combine.
  5. Sift in the flour and baking powder and fold into the mixture.
  6. Gently stir in the blackberries.   Some will get a bit crushed when they are stirred in but this is fine as it spreads the flavour!
  7. Put around two tablespoons of the mixture into each of the lined holes in your muffin tray.
  8. Put the muffin tray into the oven and bake the muffins for 20 minutes.  They will be ready when they are risen and golden on top.
  9. Remove the tins for the oven and allow the muffins to cool for five minutes before removing from the tin.

Blackberry Muffins


Notes

If you don’t have shop-bought liners, you can easily make your own by cutting baking parchment into squares and using a small jar or tin to mould each square into the hole in the tin before adding the mixture.

Blackberry Muffins

Keywords: muffins, blackberries

Recipe shared on “Cook, Blog, Share” by Easy Peasy Foodie and on #Baking Crumbs by Apply to Face Blog and Jo’s Kitchen Larder

Loved this recipe? You may also like the following recipes. Or checkout the Recipe Index.

Easy Red Velvet Cake recipe

Easy Red Velvet Cake recipe

This easy Red Velvet Cake recipe is an English version of a very popular American cake. My daughter asked for a Red Velvet Cake for her birthday and, as I had never made one before, I had to do a bit of research! I have to say that I was a bit sceptical – it is a chocolate cake but with relatively small amount of chocolate and a large amount of vanilla – but the end result was delicious. It seemed to be a strange mixture of chocolate and vanilla but the tastes work brilliantly with each other and the vanilla flavour is picked up in the cream cheese icing. So, it is really a vanilla cake with a bit of chocolate rather than a chocolate cake!

My go-to recipe for cakes is generally a basic Victoria Sponge. However, this recipe has encouraged me to be a bit more adventurous in my cake making. Using a combination of butter and oil makes the cake both flavoursome and moist and the buttermilk adds a tangy richness that works well with the cream cheese icing.

A cake and a dessert…

When I served this Red Velvet Cake for my daughter’s birthday, I decided to use it as dessert. It is the kind of versatile cake that works well as either a dessert or as a stand-alone, afternoon tea type cake. I served it with lots of juicy fresh strawberries which complemented the vanilla and chocolate flavour of the sponge and the tangy cream cheese icing. It was a large cake, and we had already had a substantial main course, but it disappeared extremely quickly!

Print
clock clock iconcutlery cutlery iconflag flag iconfolder folder iconinstagram instagram iconpinterest pinterest iconfacebook facebook iconprint print iconsquares squares iconheart heart iconheart solid heart solid icon
Red Velvet Cake with Strawberries

Easy Red Velvet Cake recipe

  • Author: Tastebotanical
  • Prep Time: 30
  • Cook Time: 30
  • Total Time: 1 hour
  • Yield: Serves 8
  • Category: Cakee
  • Method: Baking
  • Cuisine: English

Description

This Easy Red Velvet Cake recipe has a strong vanilla flavour combined with a delicate taste of chocolate and is coated with tangy cream cheese icing.


Ingredients

Scale

For the cake:

  • 115 g slightly salted butter
  • 400 g soft brown sugar
  • 250 g vegetable oil 
  • 4 eggs, separated
  • 1 tablespoon vanilla extract
  • 1 teaspoon white vinegar
  • 250 ml buttermilk
  • red food colouring (gel gives the best colour)
  • 300 g plain flour
  • 50 g corn flour
  • 1 teaspoon baking soda
  • 2 tablespoons cocoa powder

For the icing:

  • 450 g cream cheese
  • 110 g unsalted butter
  • 550 g icing sugar
  • 2 tablespoons of vanilla extract

Red Velvet Cake with Strawberries


Instructions

  1. Set your oven to 180 C, 400 F or Gas Mark 4.
  2. Grease two 9 inch cake tins and line the base of each with a circle of baking parchment,
  3. Using a food processor, mix the butter and soft brown sugar.  Then add the vegetable oil, egg yolks, vanilla extract, vinegar, buttermilk and red food colouring to the mixture.
  4. Using a sieve, sift in the plain and corn flours, baking soda and cocoa powders.
  5. In a separate bowl, beat the egg whites until they form soft peaks.  Then fold them into the cake mixture.
  6. Put half of the mixture into each greased baking tin and put them in the oven for 30 minutes.
  7. Remove from the oven and allow to cool.
  8. Make the icing by beating together the cream cheese, unsalted butter, icing sugar and vanilla extract.
  9. Use the icing to sandwich together the two cakes and then spread it on the top and sides of the assembled cake.

Red Velvet Cake with Strawberries


Keywords: red velvet, cake

Loved this recipe? You may also like the following recipes. Or checkout the Recipe Index.

Cheese Biscuits

Home-made Cheese Biscuits with Chilli

These Cheese Biscuits with Chilli are a heated-up version of a basic cheese biscuit recipe. They are fantastic as a snack with drinks as they are deliciously cheesy and pack a big load of chilli heat. I think they go particularly well with a beer!

I have been making the basic biscuits for years and if you are not a lover of spicy food, you can leave out the chilli. If you are serving them with wine, the non-spicy version might be better. Or you could do a batch and put chilli in one half.

I have a taste for savoury, salty snacks, which I try to moderate generally and indulge occasionally. One of the good things about making your own snacks is that you are in control of the salt levels. Adding strong flavour elements, such as chilli, also helps with this as it means that the snacks have a powerful hit of flavour without being overly salty.

Whether you are looking for a plate of snacks ready for a box-set binge evening or for a drinks party, these Cheese Biscuits with Chilli are fantastic. They will keep in a sealed tin for several days once baked. Even better, you can keep the dough in the refridgerator for a week and slice and cook the biscuits when you want to eat them. You can also freeze the dough for several months. I always prepare a large batch of cheese biscuit dough in the run-up to Christmas and refridgerate or freeze which means that I can have freshly baked home-made biscuits within minutes.

If you are in a snacking mood, you might also like to try my recipes for Spiced Nuts and Marinated Feta. Both are really easy and are great at a party or if you are just watching television with a cold beer!

Print
clock clock iconcutlery cutlery iconflag flag iconfolder folder iconinstagram instagram iconpinterest pinterest iconfacebook facebook iconprint print iconsquares squares iconheart heart iconheart solid heart solid icon
Cheese Biscuits

Cheese Biscuits

  • Author: Tastebotanical
  • Prep Time: 10
  • Cook Time: 10
  • Total Time: 20 plus 60 minutes rest time
  • Yield: Around 30 biscuits 1x
  • Category: Biscuits
  • Method: Baking
  • Cuisine: English

Description

Whether you make these Cheese Biscuits with or without chilli, they are a fantastic snack with drinks or for a box-set binge.  The dough can be kept in the fridge or freezer and baked whenever you feel like fresh home-made biscuits.


Ingredients

Scale
  • 100 g butter (at room temperature)
  • 100 g strong cheese (eg Cheddar)
  • 100 g plain flour
  • 1 teaspoon chilli flakes


Instructions

  1. Put all the ingredients into a food processor and blend until combined to form a dough.
  2. Roll the dough into a sausage shape, wrap in cling film and place in the fridge to chill for an hour.
  3. Set your oven to 180 degrees C or Gas Mark 4.
  4. Remove the dough from the fridge and cut across to form disks approximately 1 cm thick.
  5. Place the disks on a greased baking tray and bake in the oven for 10 minutes until golden.
  6. Remove from the oven and place the biscuits on a baking rack to cool.

Notes

  • If you don’t like chilli, you can leave it out.  The plain, cheese biscuits are delicious too! 
  • The baked biscuits will keep for several days in an air-tight tin.
  • The dough can be kept in the fridge for a week.  So that you can cut it into discs and bake for home-made biscuits within minutes.
  • The dough can also be frozen for several months.

Keywords: biscuits, cookies, savoury biscuits, chilli, cheese biscuits

Loved this recipe? You may also like the following recipes. Or checkout the Recipe Index.

Lavender Cake

Easy Lavender Loaf Cake

Just the name, Lavender Cake, makes me think about an English summer garden. I love the calming floral fragrance of fresh lavender, which is held in both the flowers and the leaves. I also think it looks beautiful with green-grey leaves and deep blue, purple or white flowers.

If you grow lavender in your garden, this is a cake to make in high summer, late June through to August when it is at its best. Make sure that it hasn’t been treated with any pesticides or other chemicals before you use it in your cooking! If you don’t grow your own lavender, you can use culinary lavender which is available from some supermarkets and also online.

Like many of the cakes that I make, this Lavender Cake is a variation on a simple loaf cake recipe. Lavender and lemon has become a popular flavour combination in cakes and desserts. For this recipe, I combined lavender with orange, which adds a similar zesty citrus flavour. It occurred to me when I had made this cake that lavender and orange are both included in the classic Herbes de Provence herb mix from the South of France which is used in savoury dishes.

So many lavender recipes….

I use lavender mainly in sweet recipes. I make Lavender Ice Cream, which is creamy and floral and fantastic at the end of a summer dinner party. If you want to give someone a summer treat, you could do worse than make them a lavender-themed Afternoon Tea with Lavender Shortbread Biscuits and Lavender Scones. I sometimes make a Honey Cream Tea, combining Cream and Honey with the Lavender Scones, which is a great twist on an English teatime tradition. If you have a lot of fresh lavender in your garden, you can capture the flavour by making Lavender Sugar which you can use as a baking ingredient.

….and so many cake recipes!

If you like this cake, you may like some of the other loaf cake recipes that I cook regularly. They are so quick and easy to make and you can get really creative with the flavours! On other pages of this blog you can find recipes for Rosemary CakeThyme Cake, Earl Grey and Orange Cake,Lemon DrizzleBlood OrangeLime and CoconutRum and Banana and Ginger and Pear.

Print
clock clock iconcutlery cutlery iconflag flag iconfolder folder iconinstagram instagram iconpinterest pinterest iconfacebook facebook iconprint print iconsquares squares iconheart heart iconheart solid heart solid icon
Lavender Cake

Lavender Cake

  • Author: Tastebotanical
  • Prep Time: 20
  • Cook Time: 45
  • Total Time: 1 hour 5 minutes
  • Yield: 1 loaf cake 1x
  • Category: Cake
  • Method: Baking
  • Cuisine: English

Ingredients

Scale

For the cake:

  • 4 tablespoons of milk
  • 1 tablespoon of fresh or half a tablespoon of dried culinary lavender
  • 125 g butter
  • 175 g Lavender Sugar (use caster sugar if you do not have Lavender Sugar)
  • 2 eggs
  • 175 g self-raising flour
  • Zest of 1 orange

For the icing:

  • Juice of 1 orange
  • 1 tablespoon of fresh or half a tablespoon of dried culinary lavender
  • 100 g icing sugar


Instructions

  1. Set your oven to 180 degrees centigrade or Gas Mark 4.
  2. Put the milk into a small bowl and add the fresh or dried culinary lavender.  Heat to scalding point and then set aside to cool.   Heating the milk allows it to take on the flavour of the lavender.
  3. Grease a 450 g loaf tin and line the bottom with baking parchment.
  4. Cream the butter with the Lavender Sugar or caster sugar.  (I usually soften the butter for about 30 seconds in the microwave first as it makes it much easier!)
  5. Gradually add the eggs to the butter and sugar mixture.  If it looks as if it is going to curdle, add some of the self-raising flour.
  6. Once the eggs have been incorporated add the rest of the self-raising flour.
  7. Add the lavender-infused milk and the grated zest of your orange.
  8. Spoon the cake mixture into your prepared loaf tin.
  9. Put the tin in the oven and bake for 45 minutes.
  10. While the cake is baking, squeeze the juice from your orange into a small bowl and add the fresh or dried culinary lavender.  Heat to scalding point and then set aside to cool.   Heating the juice allows it to take on the flavour of the lavender.
  11. When your cake is done.  Remove it from the oven and place on a cooling rack. 
  12. When the cake is completely cool.  Combine the lavender-infused orange juice with the icing sugar and then pour over the cake.

Keywords: lavender, cake, loaf cake

Loved this recipe? You may also like the following recipes. Or checkout the Recipe Index.