Asparagus Quiche with Fresh Herbs
This Asparagus Quiche with Fresh Herbs is the perfect early summer lunch or supper recipe. In May and early June, bunches of seasonal fresh asparagus start to appear in the shops and it is time to look up recipes that make the most of it. It is the time of year when the weather becomes warmer and having a picnic or eating outside in the garden become more realistic prospects. It is also the time of year when outdoor concerts or plays, village fetes and sporting events start to take place. If you are looking for the perfect dish to take along to any of these, something easy, seasonal but luxurious, look no further than home-made Asparagus Quiche.
- Easy Shortbread Recipe
- Cranberry Gin
- Beetroot Soup with Coconut
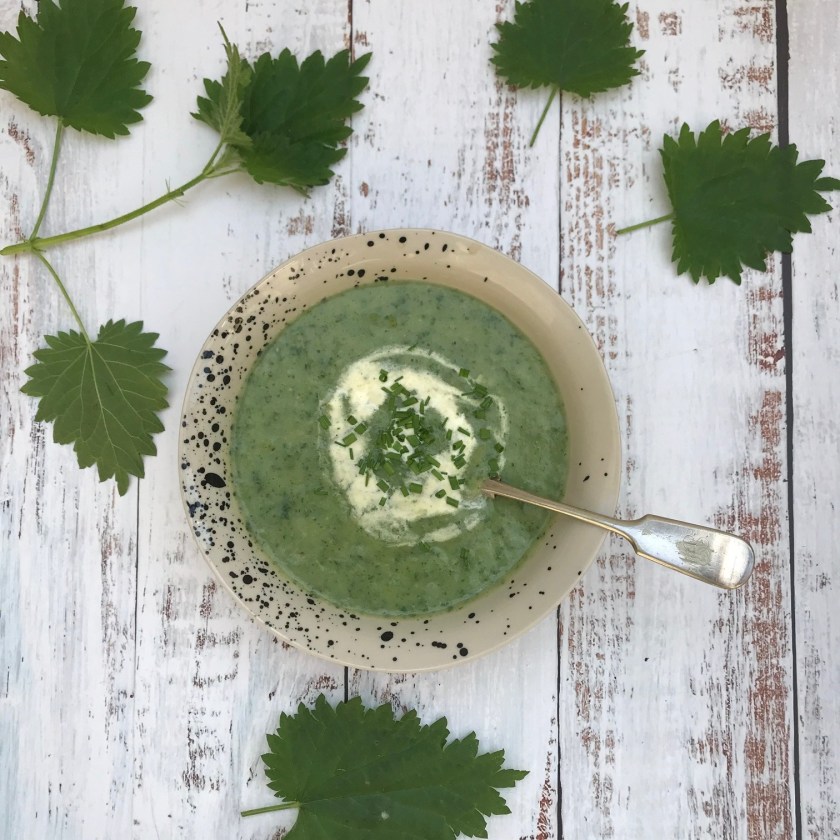
- Leek and Potato Soup with Fresh Chives
- Blackberry Gin

What you need to know about Asparagus Quiche with Fresh Herbs
- I generally make my own pastry. It took me many years to realise how easy it is and I do think it tastes better than ready-made pastry. However, if making pastry is not your thing, or you have limited time, you can use ready-made shortcrust pastry. This will make this quiche even quicker and easier to make.
- Make sure you use fresh asparagus. There are lots of different varieties, particularly if you go to a farmers market or farm shop, and any would be good in this recipe.
- A great technique when you are preparing asparagus is to remove the base of each spear by bending it until it snaps. It will naturally break at the point where the woody and unpalatable stem meets the edible part of the spear.
- Make sure you do not overcook the asparagus. This is the basic rule of cooking asparagus. You need to make sure it has a little “bite” and retains its unique flavour.
- I generally flavour this quiche with a combination of dill and chives. However, you can choose any non-woody herbs that you prefer. Tarragon and lemon balm would also be excellent choices.
- Mature cheddar is my cheese of choice in this quiche as I think it adds a bit of oomph to the asparagus without overpowering it. You can try other cheeses but I would steer clear of blue cheese.
- You can eat this quiche either hot, warm or at room temperature. We will sometimes eat it hot with buttery boiled new potatoes for supper. It also is great at room temperature as part of a summer buffet or in a lunch box. If you are making it ahead of time, you can keep it in the fridge for a couple of days. Make sure that you bring it out of the fridge at least half an hour before you plan to eat it as it is not at its best if it is icy cold.

Other asparagus recipes
Every year, I look forward to early summer when fresh asparagus is in season. Nowadays, you can buy it all year round but I am a strong believer in eating seasonal, local food. This means that early summer is the time when I get to indulge my love of fresh asparagus. It is great treated simply, just steamed for a few minutes and then either eaten hot with butter or at room temperature with a simple olive oil and vinegar dressing.
However, it is also a fantastic basis for quiches and savoury tarts. In addition to this Asparagus Quiche, I also make an Asparagus Tart, using ready-made puff pastry, which is fantastic quick and easy lunch or supper dish. I also make a cold Asparagus and Pea Soup with Chervil which is great on a hot summer day either as a light lunch or as a starter for a dinner party.
There are many different types of asparagus with variation in colour, the most common is green asparagus but you can get purple and white, and also the thickness of the stems. If you look in your local farmers’ market or farm-shop at this time of year, you might be lucky and find a variety of different types.

Other quiche and tart recipes
Savoury tarts and quiches are a fantastic, cook-ahead simple supper or lunch. They are easy to make and are great either hot or at room temperature. They can also be easily divided into portions if you are feeding a large number of people. Easily transportable, they also make a good addition to lunch-boxes or basis for a picnic. Some of my favourites are listed below.
- I have a very simple Asparagus and Herb Cheese Tart which uses ready-made puff pastry and is quite different from this Asparagus Quiche.
- Two kinds of onion tart – Caramelised Onion Tart which is based on sweet, slow-cooked onions and another version, Onion Tart with Wild Garlic, which has the addition of fresh herbs. I also have an easy Shallot Tart with Thyme and Anchovy which uses ready-made puff pastry.
- I also have two very different carrot-based tarts. Carrot and Coriander Tart combines these two classic flavours in a simple quiche-style savoury tart. Carrot Tart uses ready-made puff pastry and combines large pieces of carrot with orange and soft cheese.
- Beetroot Tart is deliciously sweet and earthy. Tomato Tart is also sweet but has a lighter and fresher flavour.
- Spinach Tart combines leaf green spinach with feta and crunchy pine-nuts.
- Butternut Squash Tart with Chilli and Sage also has a sweetness to it but this is off-set by the addition of a little hot chilli.
- Feta Quiche with Roasted Peppers is a fantastic comination of rich, smoky roasted peppers with salty feta cheese.
- If you love garlic, you will like my Garlic Tart which is a celebration of one of my favourite flavours!
- I also have a couple of fish-based recipes. My Crab and Prawn Tart has Asian-inspired flavours of coriander, lime and chilli. My Smoked Salmon Tart with Prawns is easy to make and is perfect for a celebratory meal or party.
- In addition to larger quiches and tarts, I also have a recipe for individual Herb Tartlets which are great as canapes or snacks.
Loved this recipe? Checkout the Recipe Index.
Asparagus Quiche with Fresh Herbs recipe
Print
Asparagus Quiche
- Prep Time: 15
- Cook Time: 30
- Total Time: 45 minutes
- Yield: Serves 6-8 1x
- Category: Quiche
- Method: Baking
- Cuisine: English
Description
Asparagus Quiche with Fresh Herbs is the perfect early summer lunch, supper or picnic recipe – easy, seasonal, luxurious and great eaten hot or cold.
Ingredients
For the pastry:
- 275 g (10 oz) plain flour
- 125 g fat (5 oz) I use a mix of half butter and half Trex as I think this makes the lightest pastry)
- Salt
- A little water
For the filling:
- 15 asparagus spears
- a large bunch of fresh dill or herb fennel (2 tablespoons when chopped)
- a large bunch of fresh chives (2 tablespoons when chopped)
- Salt and pepper
- 100 ml (4 fl oz) double cream
- 2 eggs
- 75 g (3 oz) Cheddar or other full-flavoured cheese

Instructions
- Set your oven to 180 C, 350 F or Gas Mark 4.
- Make the pastry. Put the flour in a bowl. Add the fat and combine – either by “rubbing in” by hand or processing – until the mixture resembles breadcrumbs. Season with salt and pepper. Add a little cold water (2-3 tbsp) and shape the mixture into a dough.
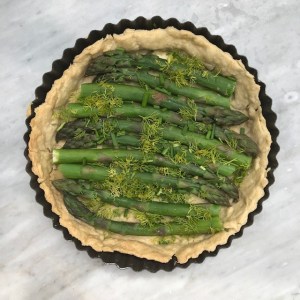
- Roll out your pastry and use it to line a 25 cm quiche or flan dish. Bake for 15 minutes in the oven to allow the pastry to “set”. This will stop the filling making it soggy and ensure that the base is crisp.
- Next, prepare the asparagus spears. Remove the base of each spear by bending it until it snaps. It will naturally snap at the point where the thicker, less palatable base section starts.
- Either steam the asparagus spears for three minutes or plunge them into boiling water for the same amount of time. This will partially cook the spears but retain their crunch and flavour.
- Place the part-cooked asparagus spears in the pastry case.
- Crack the eggs into a mixing bowl, add the cream, and beat until combined. Grate the cheese and add to the mixture. Then finely chop the dill (or herb fennel) and chives and also add to the bowl. Season with salt and pepper and then pour it into the pastry case.
- Place your quiche or flan dish in the oven and cook for 25 minutes.
Notes
This Asparagus Quiche can be eaten hot, warm or at room temperature.
This recipe has been shared on #CookBlogShare with the Peachicks Bakery and #Fiesta Friday with Fiesta Friday